

How to use GraphML in the web interface
Learn how to create, configure, and run a full machine learning workflow for GraphML in four steps using the features in the ArangoDB web interface
The GraphML workflow in the web interface
The entire process is organized into sequential steps within a Project, giving you a clear path from data to prediction. Jobs are displayed on a board with four columns, one for each phase:
- Featurization: Select your data and convert it into numerical representations.
- Training: Train a GraphSAGE model on the features and graph structure.
- Model Selection: Evaluate the trained models and choose the best one.
- Prediction: Use the selected model to generate predictions on your data. You can also automate the prediction process to run at regular intervals.

Create a GraphML project
To create a new GraphML project using the Arango Contextual Data Platform web interface, follow these steps:
- From the left-hand sidebar, select the database where you want to create the project.
- In the left-hand sidebar, click Agentic AI Suite, then click GraphML. You can also open the Agentic AI Suite overview and click Run GraphML.
- In the GraphML projects view, click Add new project.
- The Create ML project modal opens. Enter a Name for your machine learning project.
- Click the Create project button to finalize the creation.
- After creation, the new project appears in the list under GraphML projects. Click the project name to open the GraphML jobs board.
The GraphML jobs board
After opening a project, you see a board displaying all jobs organized into four columns: Featurization, Training, Generated Models, and Prediction.
For new projects with no existing jobs, the New Featurization modal automatically opens, prompting you to configure and start your first featurization job.
For existing projects, you can:
- Click any job card to view details and proceed to the next phase;
- Click Start a new job to create a new featurization job;
- Use the GraphML Workflow Guide panel for quick reference.
Job cards display the job ID, status, database, and submission time. Key statuses include: QUEUED, RUNNING, READY FOR TRAINING, READY FOR MODEL SELECTION, COMPLETED, or FAILED if errors occur.
Featurization phase
To start a new featurization job, click Start a new job from the jobs board, or for empty projects, the New Featurization modal opens automatically.
In the featurization modal, configure your job as follows:
- Select a Graph: In the Features section, choose your target graph from the Select a graph dropdown menu.
- Select Vertex Collection(s): Pick the node collection(s) that you want to include for feature extraction.
- Select Attributes: Choose the attributes from your node collection to convert into machine-understandable features. Attributes cannot be used if their values are lists or arrays.
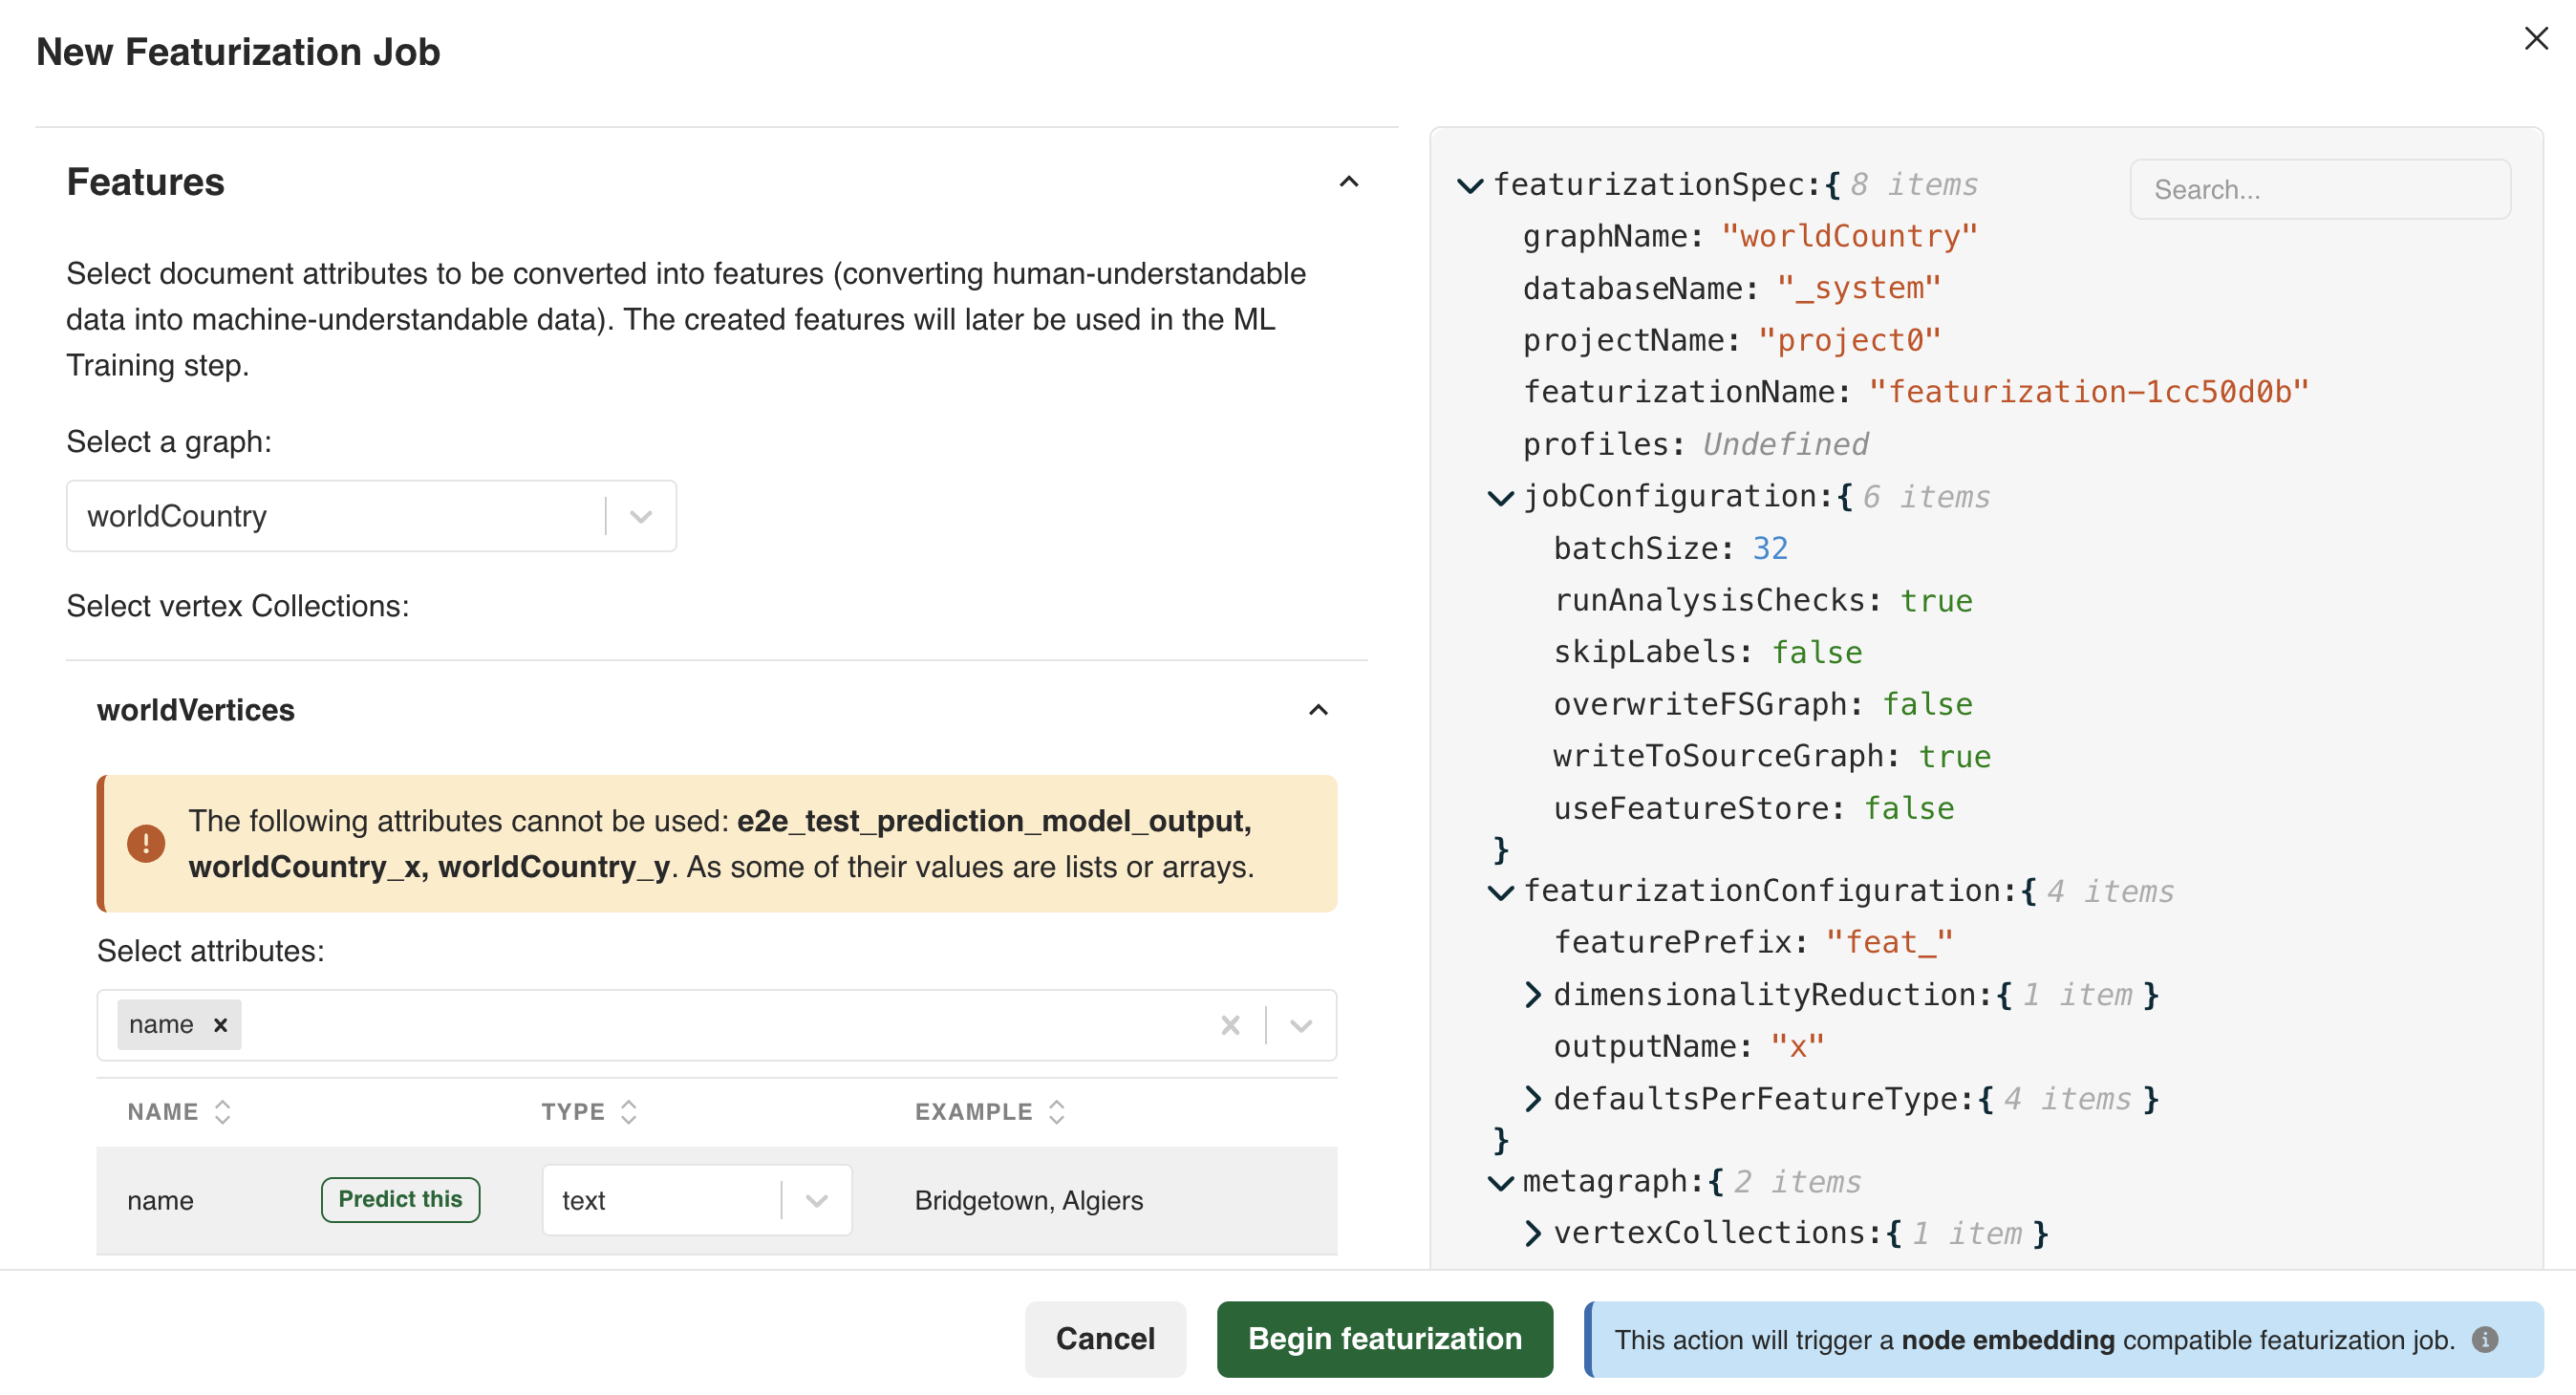
Configuration options
The featurization process has several configurable options, grouped into Configuration and Advanced settings. These are also shown in a JSON format on the right side of the modal for transparency.
In the Configuration tab, you can control the overall featurization job and how features are stored.
- Batch size: The number of documents to process in a single batch.
- Profiles: Add one or more profiles to specify pod configurations for the
project (e.g.,
gpu-g4dn-xlarge). - Run analysis checks: Whether to run analysis checks to perform a high-level
analysis of the data quality before proceeding. The default value is
true. - Skip labels: Skip the featurization process for attributes marked as labels.
The default value is
false. - Overwrite FS graph: Whether to overwrite the Feature Store graph if features
were previously generated. The default value is
false, therefore features are written to an existing Feature Store graph. - Write to source graph: Whether to store the generated features on the Source
Graph. The default value is
true. - Use feature store: Enable the use of the Feature Store database, which
allows you to store features separately from your Source Database. The default
value is
false, therefore features are written to the source graph.
Handling imperfect data
Real-world datasets often contain missing values or mismatched data types. Use the strategies below to control how each feature type (Text, Numeric, Category, Label) handles these issues during featurization.
| Strategy type | Option | Description | When to use |
|---|---|---|---|
| Missing | Raise | Stops the job and reports an error when a value is missing. | When missing data indicates a critical issue. |
| Replace | Substitutes missing values with a default you provide (e.g., 0 for numbers, "unknown" for text). | When missing values are expected. | |
| Mismatch | Raise | The strictest option. Stops the job on any data type mismatch. | When any data type mismatch indicates a critical error. |
| Replace | Replaces mismatched values with a default you provide, without trying to convert it first. | When mismatched values are unreliable, and you prefer to substitute it directly. | |
| Coerce and Raise | Attempts to convert (coerce) the value to the correct type (e.g. string “123” to number 123). If the conversion is successful, it uses the new value. If it fails, the job stops. | A balanced approach, often the best default strategy. | |
| Coerce and Replace | The most forgiving option. The system first tries to convert the value. If it fails, it replaces the value with the specified default and continues the job. | For very dirty datasets where completing the job is the highest priority. |
Once you’ve set your strategies, click Begin featurization to submit the job. The button shows a loading state while the job is being submitted. After submission, the modal closes and the new job appears in the Featurization column on the jobs board with a QUEUED status.
As the job progresses, its status updates automatically. You can click the job card at any time to view details or cancel a queued or running job using the Cancel job button. When the job status updates to READY FOR TRAINING, you can proceed to the Training phase.
Training phase
The training phase is the second step in the ML workflow after featurization. Once your featurization job completes with a status of READY FOR TRAINING, click the job card in the Featurization column to open the job details modal.
The job details modal displays:
- Meta Graph: Shows the vertex and edge collections and attributes you selected
- Featurization Job Status: Displays “READY FOR TRAINING”
- Training configuration form: Appears on the right side of the modal
In the training configuration form, select the type of model you want to train from the Select a type of training job dropdown menu: Node Classification or Node Embeddings.
Node classification
Node Classification is used to categorize the nodes in your graph based on their features and structural connections within the graph.
Use cases include:
- Entity categorization (e.g. movies into genres, users into segments)
- Fraud detection in transaction networks
Configuration parameters:
- Type of Training Job: Node classification
- Target Vertex Collection: Choose the collection to classify (e.g.
movie) - Batch Size: The number of documents processed in a single training iteration. (e.g.
256) - Data Load Batch Size: The number of documents loaded from ArangoDB into memory in a single batch during the data loading phase (e.g.
50000). - Data Load Parallelism: The number of parallel processes used when loading data from ArangoDB into memory for training (e.g.
10). - Enable GPU: Enables GPU-accelerated training using GPU-capable profiles
configured for the project (e.g.,
gpu-g4dn-xlarge).
After setting these values, click the Begin training button to submit the job. The button displays a loading state during submission, then the modal closes and the training job appears in the Training column.
Node embeddings
Node Embeddings are used to generate vector embeddings (dense numerical representations) of graph nodes that capture structural and feature-based information.
Use cases include:
- Similarity search (e.g. finding similar products, users, or documents)
- Link prediction (e.g. suggesting new connections)
Configuration parameters:
- Type of Training Job: Node embeddings
- Target Vertex Collection: Select the collection to generate embeddings for (e.g.
movieorperson) - Embedding size: The dimensionality of the generated embedding vectors (e.g.
256) - Batch Size: The number of documents processed in a single training iteration (e.g.
256) - Data Load Batch Size: The number of documents loaded from ArangoDB into memory in a single batch during the data loading phase (e.g.
50000) - Data Load Parallelism: The number of parallel processes used when loading data from ArangoDB into memory for training (e.g.
10) - Enable GPU: Enables GPU-accelerated training using GPU-capable profiles configured for the project
- No label is required for training in this mode
The target collection is where the model’s predictions are stored when running a prediction job.
Once the configuration is complete, click Begin training to submit the job. After submission, the training job appears in the Training column on the jobs board. When complete, trained models appear in the Generated Models column.
Model selection phase
Once training completes with a status of READY FOR MODEL SELECTION, click the training job card in the Training column to open the job details modal.
The modal displays a table of all trained models with their performance metrics:
- Model ID: Unique identifier for each model
- Accuracy: Overall correctness of predictions (for classification)
- Precision: Ratio of correct positive predictions
- Recall: Ratio of actual positives correctly identified
- F1 score: Harmonic mean of precision and recall
- Loss: Training loss value (for embeddings)
- Matrix: Button to view the confusion matrix (for classification models)

Selecting a model
To select a model for prediction:
- Review the performance metrics in the table to identify the best performing model
- Click the radio button next to your chosen model to select it
- For classification models, optionally click the Matrix button to view the confusion matrix and understand model performance across different classes
- Click the Select model for prediction button at the bottom of the modal

After selecting a model, the prediction configuration form appears, allowing you to set up and run predictions using the selected model.
Prediction phase
After selecting a model in the Model Selection phase and clicking Select model for prediction, the prediction configuration form appears. This allows you to configure how inference runs using the selected model.
You can specify which collections are involved and whether new or outdated documents should be automatically featurized before prediction.
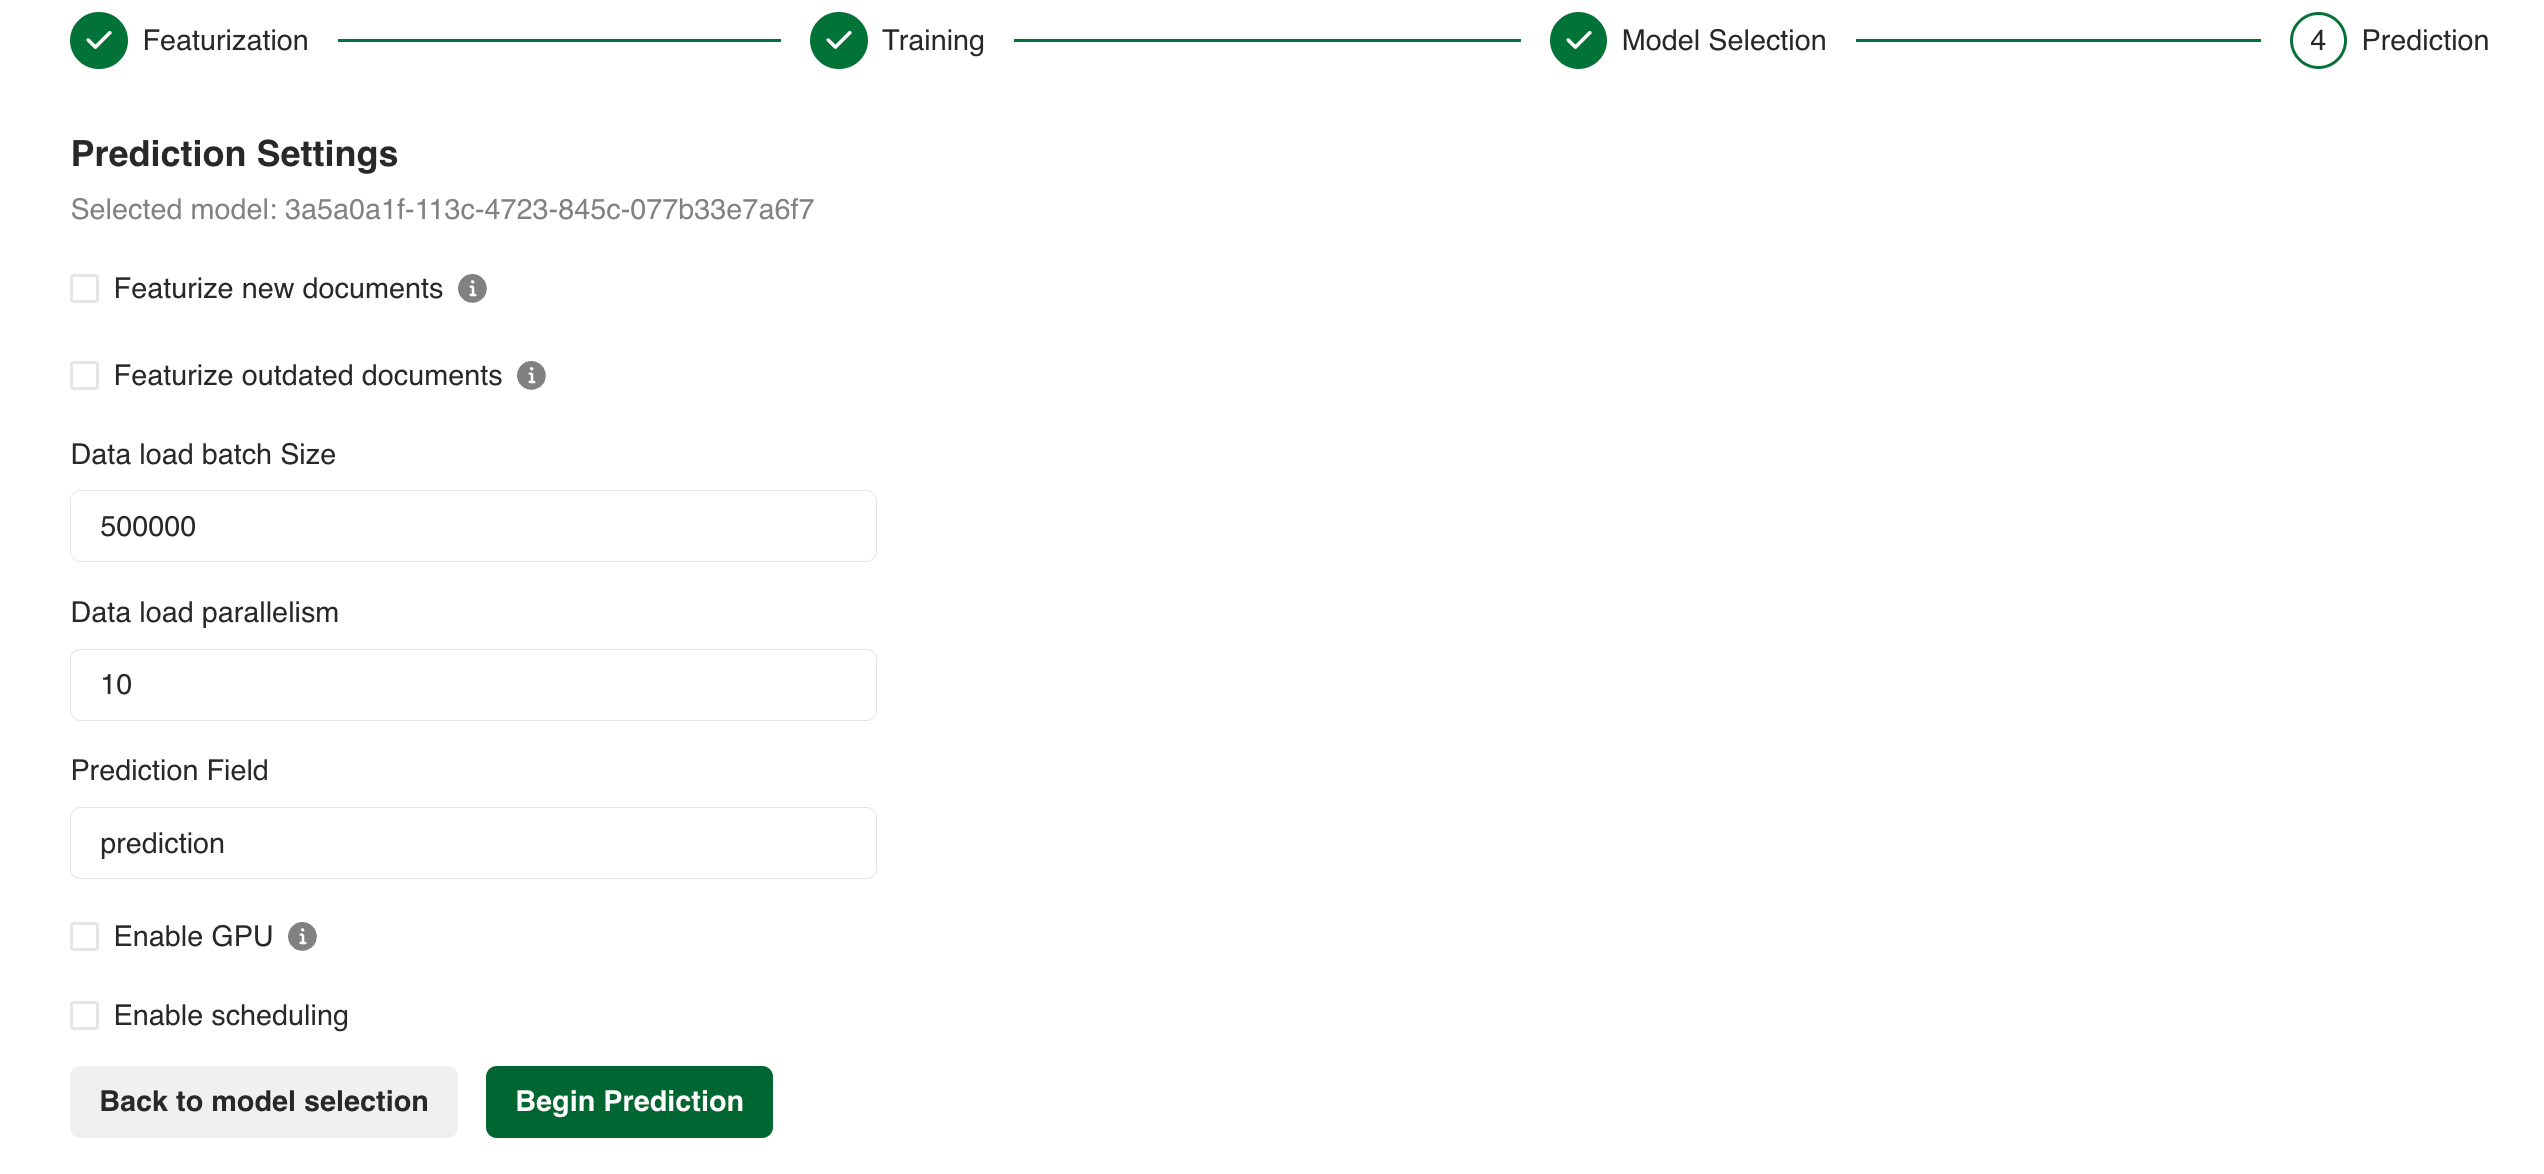
Configuration options
Configure your prediction job with the following options:
- Select Model: Displays the model you selected. This model performs the inference.
- Target Vertex Collection: The node collection on which predictions are applied.
- Prediction Type: Depending on the training job (classification or embedding), the prediction outputs class labels or updated embeddings.
- Prediction field: The field in the documents where the predicted values are stored.
- Data load batch size: Specifies the number of documents to load in a
single batch (e.g.
500000). - Data load parallelism: The number of parallel threads used to process
the prediction workload (e.g.
10). - Enable GPU: Enables GPU-accelerated prediction using GPU-capable profiles
configured for the project (e.g.,
gpu-g4dn-xlarge).
Featurization options
You have two important options for handling dynamic data:
- Featurize new documents: Enable this option to generate features for documents that have been added since the model was trained. This is useful for getting predictions on new data without having to retrain the model.
- Featurize outdated documents: Enable this option to re-generate features for documents that have been modified. Outdated documents are those whose attributes (used during featurization) have changed since the last feature computation. This ensures your predictions reflect the latest changes to your data.
These options provide flexibility in handling dynamic graph data and keeping predictions relevant without repeating the entire ML workflow.
Enable scheduling
You can configure automatic predictions using the Enable scheduling checkbox. When scheduling is enabled, predictions run automatically based on a set CRON expression. This helps keep prediction results up-to-date as new data is added to the system.
You can define a cron expression that sets when the prediction job should run.
The cron syntax is a set of five fields in a line, indicating when the job should
be executed. The format must follow the following order: minute hour day-of-month month day-of-week
(e.g. 0 0 * * * for daily predictions at 00:00, or 0 0 1 1 * to execute the prediction
on January 1st at 00:00).
When a field is set to an asterisk *, it means that any value is allowed for that field,
whenever the other field conditions are met.
Below the CRON field, a user-friendly scheduling interface helps translate it:
- Period: Options include Hourly, Daily, Weekly, Monthly, or Yearly.
- Month: Indicates the month. For example,
1for January. - Day of Month: Indicates the day of the month. For example,
1for the first day of the month. - Day of Week (optional): Indicates the day of the week. For example,
Monday is
1and Tuesday is2. - Hours and Minutes: Set the exact time for execution. For example,
if the hour is set to
8and the minute to0, then the job runs at 8:00 AM.
Execute prediction
After reviewing the configuration, click the Run Prediction button to submit the job. The button shows a loading state during submission. Once submitted, the modal closes and the prediction job appears in the Prediction column on the jobs board.
Click a completed prediction job card to view its results. You can analyze the results directly in the Web Interface or export them for downstream use.
Limitations
- Edge Attributes: The current version of GraphML does not support the use of edge attributes as features.
- Dangling Edges: Edges that point to non-existent nodes (“dangling edges”) are not caught during the featurization analysis. They may cause errors later, during the Training phase.
- Memory Usage: Both featurization and training can be memory-intensive. Out-of-memory errors can occur on large graphs with insufficient system resources.